Dec 31, 2012

Super Angel Green Lens Review

Hiya!
This would be my last article before the year ends :3
Bought this lens from Ayu Salvador~


Diameter: 14.8mm
Base Curve Radius: 8.40 ~ 8.60mm
C.T: 0.04 ~ 0.13mm
Water Content: 38 ~ 42%
Using Cycle: One Year
Power Range: Plano (0.00)
Manufacturer: Geo Medical Inc.


 Picture of the lens in person~


Some pictures of me wearing the lens~ <3

Photos by Ron Naldo~


Visibility: 3.5/5
Enlargement: -4/5
Comfort: 5/5
Design: 4/5


I wouldn't really recommend this if you're looking for lens that really shows its greenness(Yes, that's a word) or its color.


That's all~Till next time, have a happy new year~ :D


Dec 30, 2012

Wig dying with acrylic paint~

I recommend this method as a last resort.
Use this if you don't know how to use the sharpie method or if sharpie markers are too expensive for you. You can also use this if you can't see any sharpie markers with the color you want/prefer.
I have some warnings for you guys. After using this method, the texture of the wig might change and you wouldn't want to destroy your babies(wigs), right? 
I dyed my Serah Farron wig because I'm not satisfied with the color, it's too light for me.


So here's what you need:
~Wig stand
~basin or something close to it (a basin that your mother won't get angry at you for using it)
~acrylic paint (be careful in choosing)
~newspaper (It's going to be a messy job)
~comb
~wig to be dyed


Check first the color if it's alright for you


Put your preferred amount of acrylic paint in the basin and add water. 
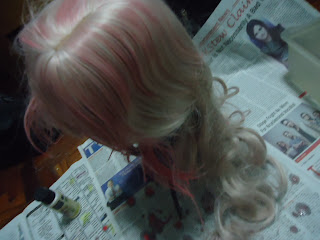
Mix until the texture becomes something like this. It kinda looks plastic-ish.

Test out the color first in some few hidden strands.


Use the comb to "paint" your wig. I guess nobody wants a 1 hued wig xD

See the color difference? :D


For the curly part of wigs, I suggest that you just put the wig in the basin w/ the acrylic paint or you could do it by hand.

Finished Product:

You can see the original color here:
http://kionezhialeron.blogspot.com/2012/07/ayanamisatoru-wig-review.html

Note:
This method is already known to some cosplayers~

That's all~Hope I helped 


Dec 17, 2012

Okita Souji Cosplay (Traditional)

BANZAIIIIIIIIIIIIII! *W*

The cosplay that I've been preparing for... HOORAY :DDDD


Costume made by my seamstress~
I cosplayed him during Animax Carnival Philippines which was held at Rob Ermita.
I wasn't really supposed to go, but since I have a friend who needs to meet up w/ me during that day, I decided to go~ hehe xD

This cosplay needs a proper place for a photoshoot Q_Q
Will update this as soon as possible!


Me as Okita Souji~
Photos by Ron Naldo


Thanks for viewing!
Till next time :3

Nov 25, 2012

Kuroya Kunoichi Cosplay

Hiya~

To tell you the truth, this cosplay was just sudden.
This was supposed to be for my Soujiro Seta cosplay, but since my tailor got the wrong color and refuses to make another one(different tailor, not the one who made my other costumes), I have to "recycle" this. I was thinking of making this into a wa lolita(fashion, not cosplay) but I ended up making this into a Kuroya Kunoichi costume. I have to make an Obi by hand and make some alteration to the costume xDD
so which means I made almost 80% of the costume & dual kodachi, 15% for the one that my tailor made, and 5% others

I'm a die hard fan of Tenchu xD Too bad that the franchise stopped or so I've heard.


Me as a Kuroya Kunoichi~
Photos belong to Choy Embrador and Thomas Regala
Taken at Wildlife Park


That's all~
Thanks for viewing
Till next time <3


Nov 19, 2012

Beatrix Cosplay~

Oh the lovely General Beatrix *A*
I love portraying her and I has fun in making her accessories and the Save the Queen.


The mighty Beatrix *A*

Here are the things I made for the costume~ I won't be including the white shorts-thingy or whatever you call it because I'm not proud of it xD


A friend of mine helped me with this~


I first cosplayed her during the PFFCG cosplay shoot at Eco park, Q.C.
NOTE: You don't have the permission to grab, duplicate,copy the photos here. This belongs to the respective photographers: Miggy Valentin, Mello Moncada &  Zell-sy Changko.


I hope I did justice for her Q_Q

We had a photoshoot at Wildlife park at JAN. 6, 2013. remade my sword and patch~
Photographers: Thomas Regala, Choy Embrador, and Vincent Noir.


As you can see here, I was not wearing my shoes for Beatrix because it got damaged while walking. I need to buy new boots for it. xD


THAT'S ALL, HOPE YOU LIKE IT <3
TILL NEXT TIME~


Oct 31, 2012

Beatrix Wig Tutorial

Bonjour~
After many trials and errors I now have been able to make those curls xD
The wig must be:
~Heat resistant
~60-80 cm
~Thick

You can have a much better Beatrix wig than me if your wig is REALLY THICK.
Unfortunately, Mine is semi-thick only so I wasn't able to fully create her big dynamic curls :<


So, this are some of the things you'll be needing:


~Blower          ~Hairspray          ~Wig stand          ~comb
~Brown paint           ~Scissors          ~wire(not visible)          ~pins
Not Shown in the pic:
~something you can use for rolling          ~Something you can use as a stand        
STEPS:~

1. Make 6 sections, 3 on top and 3 at the bottom. It's to avoid a bulking lace and to avoid difficulty inserting the eye patch.

2. Get one section, comb it until it's free from any tangles then spray it with a bit of hairspray.


3. Roll 1 section of the hair with a use of something cylindrical or you may use your hands.
Place something that you can use as a stand and then spray again with a hairspray.


4. You may use the blower so it would heat up the wig. Wait for at least 25-35 seconds and then check if it's hard/sturdy enough.


5. Cut about 3-4 cm of wire.


6. Put some wires in the ends because those are some of the "weak points". You may add at the middle.


7. You might want to paint the wire before you place it, that's the mistake I made. xD
Anyway, pick a color that will blend w/ the wig.

8. If not in use, might as well store it with a wig cap and place it in a ziplock bag.

Finished product:


If you have any questions, feel free to PM me here

Hope I helped >..<
Till next time~